Sl1, K1 ad nauseum
I'd like to begin by admitting that I probably should not be so hard on this project. If I hadn't already learned this technique, I would have been dazzled and charmed. However, as it happens, I have already used this technique and found it to be largely unnecessary. Double knitting is when you product two "right" sides of knitted fabric at once. The stitches alternate which side they belong to, and working double knit produces a stretchy, cushy, thick piece of fabric. Double knit lends itself particularly well to colorwork, because if you work the two sides of your piece as inverses of each other it virtually eliminates floats. I will admit that while the end result is lovely, I do not like to do double knitting as I find it needlessly fussy and tedious (and generally speaking I LIKE things to be fussy and tedious...the fussier and more tedious the better!).
The double knitting Elizabeth Zimmermann tasks us with in the Knitter's Almanac is not colorwork, however. It is plain double knit, which allows the knitter to avoid some of the fussiness of colors in double knit since you are using only one strand at a time and working only one side at time. The blanket, in fact, is basically identical to the Hoover blanket, whose fascinating history you can read about on Knitty. EZ of course adds some genius short rows to help keep the borders neat. She calls for extra rows in the center of the blanket so the border is forced to stretch neatly along the side. This is in direct contrast to the Hoover blanket directions, which calls for extra border rows to be worked in order to make up for the different in row gauge between stockinette and garter stitch. In my opinion, EZ has the more correct approach. When I swatched without any extra rows, I found that my edges were tending to bunch and ruffle from having too much fabric; her short rows in the center eliminated that problem. The pictures on Knitty do show nice, well-behaved borders, too, though, so perhaps more investigation is necessary. Regardless, I find this method for making a blanket to be slow, and with no patterning beyond the short rows, it is unstimulating and a bit boring. I dutifully worked up the smallest rectangle that could possibly pass as a blanket and moved on to more exciting projects.
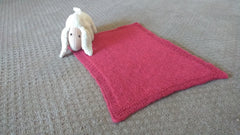
I did enjoy the yarn I chose - Schulana Lanalpaco. This is a blend of wool, alpaca, and cotton, perfect for babies as it is extremely soft, light, and warm. This small size only took 150g, which was a great relief since EZ called for 400g for a blanket only a bit larger than the one I made. I was able to knit this up in about a week, and I think it would make a very serviceable car seat blanket, floor pad (for baby's "kicking exercises" as EZ writes), and eventually doll/stuffed animal blanket. Here's a link to my Ravelry project page.
If I were inclined to make another blanket of this style (two layers of stockinette with garter border all around), I think I would knit a tube of the width and length that I wanted the center panel to be, then pick up stitches all around and knit the border circularly, increasing at the corners so it would lie flat. This would be much faster and yield an equally good blanket.
For those who are wondering, the first time I encountered this technique was in the course of a completely different baby blanket project.
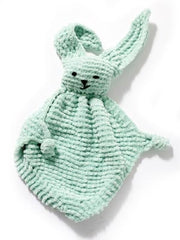
The image is shamelessly stolen from the Lion Brand website, where you can find the free pattern. I didn't take a picture of my version before I gave it away (over 10 years ago...), but it looked about the same - pale green yarn and all!
I think the use of it here is much more appropriate as it saves the knitter from having to switch to circular needles at the last minute for the head. Also, it's not used throughout; it's used with a purpose. Also, bunnies are cute.
Leave a comment